简单字符驱动程序与中断

1.前言

本文将实现一个简单的字符驱动程序,同时在驱动程序的内核模块中注册一个中断处理函数,用来获取键盘的扫描码并存入缓冲区中,最后使用用户态程序访问字符驱动程序,取出键盘扫描码。
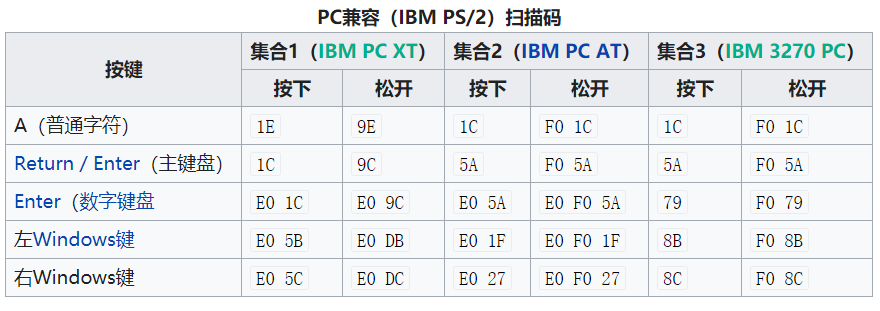
中断常用于键盘、鼠标等IO设备,当用户按下键盘时,会产生一个键盘扫描码。例如下面ps/2接口的键盘扫描码,它使用一个数字或数字序列来表示分配到键盘上的每个按键。

在这里插入图片描述

2.内核模块初始化

内核模块在初始化的时候不仅仅需要注册一个字符设备,现在还需要在模块初始化的时候就向系统中的中断请求队列挂入我们自己的中断服务程序,也就是对其进行注册,使用的函数是

1
2
3
4
5
6
7
8
9
10
11
12
13
14
15
request_irq(unsigned int irq, 
irq_handler_t handler,
unsigned long flags,
const char *name,
void *dev)。

irq是要申请的硬件中断号。

handler是向系统注册的中断处理函数,是一个回调函数,中断发生时,系统调用这个函数,dev参数将被传递给它。

flags是中断处理的属性,若设置了IRQF_DISABLED ,则表示中断处理程序是快速处理程序,快速处理程序被调用时屏蔽所有中断,慢速处理程序不屏蔽;若设置了IRQF_SHARED (老版本中的SA_SHIRQ),则表示多个设备共享中断,若设置了IRQF_SAMPLE_RANDOM(老版本中的SA_SAMPLE_RANDOM),表示对系统熵有贡献,对系统获取随机数有好处。

name设置中断名称,通常是设备驱动程序的名称 在cat /proc/interrupts中可以看到此名称。
dev在中断共享时会用到,一般设置为这个设备的设备结构体或者NULL
request_irq()返回0表示成功,返回-INVAL表示中断号无效或处理函数指针为NULL,返回-EBUSY表示中断已经被占用且不能共享。

由于我们要监控键盘的输入中断,当 I/O 设备把中断信号发送给中断控制器时,与之关联的是一个中断号。因此应当使用键盘控制器的中断号。查看proc文件系统下的中断号分配情况:

1
cat /proc/interrupts

在这里插入图片描述

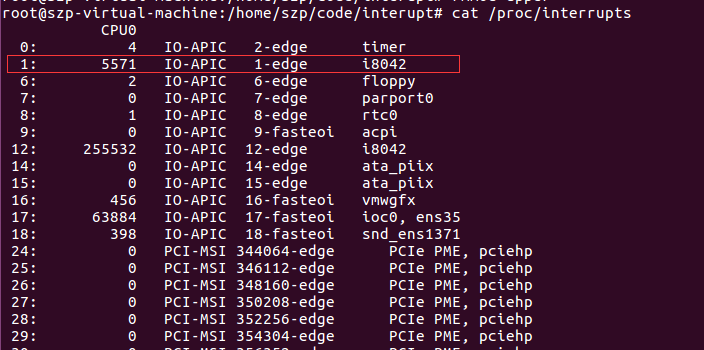
可以看到键盘控制器intel 8042的中断号为1。因此注册中断的时候中断号应当设置为1。

8042负责读取键盘扫描码并将其存在缓冲器中供程序读取;另外还有一个芯片ECE1077,它负责连接键盘和EC,将键盘动作转换成扫描码。CPU通过两个IO端口与8042通信,这两个IO端口就是0x60,0x64端口。

8042有四个8位的寄存器,它们是输入寄存器(RO)、输出寄存器(WO)、状态寄存器(RO)和命令寄存器(R/W)。

读输出寄存器:inb(0x60);

写输入寄存器:outb(0x60,data);

读状态寄存器:inb(0x64);

b:代表一个字节。
outb() I/O 上写入 8 位数据 ( 1 字节 )。
outw() I/O 上写入 16 位数据 ( 2 字节 );
outl () I/O 上写入 32 位数据 ( 4 字节)。

状态寄存器:

Bit7: PARITY-EVEN(P_E): 从键盘获得的数据奇偶校验错误

Bit6: RCV-TMOUT(R_T): 接收超时,置1

Bit5: TRANS_TMOUT(T_T): 发送超时,置1

Bit4: KYBD_INH(K_I): 为1,键盘没有被禁止。为0,键盘被禁止。

Bit3: CMD_DATA(C_D): 为1,输入缓冲器中的内容为命令,为0,输入缓冲器中的内容为数据。

Bit2: SYS_FLAG(S_F): 系统标志,加电启动置0,自检通过后置1

Bit1: INPUT_BUF_FULL(I_B_F): 输入缓冲器满置1,i8042 取走后置0

Bit0: OUT_BUF_FULL(O_B_F): 输出缓冲器满置1,CPU读取后置0

命令寄存器:

Bit7: 保留,应该为0

Bit6: 将第二套扫描码翻译为第一套

Bit5: 置1,禁止鼠标

Bit4: 置1,禁止键盘

Bit3: 置1,忽略状态寄存器中的 Bit4

Bit2: 设置状态寄存器中的 Bit2

Bit1: 置1,enable 鼠标中断

Bit0: 置1,enable 键盘中断

有了以上知识,再对照键盘的扫描码表,我们就可以编写程序读取并判断键盘输入的数据,并根据不同的按键执行不同的动作。

内核模块处理函数中,还申请了一个kfifo环形缓冲区,用于存储我们获取到的键盘扫描码。

1
2

ret = kfifo_alloc(&key_buf, 32, GFP_ATOMIC);

剩余的工作就全都是注册一个字符设备驱动。

1
2
3
4
5
6
7
8
9
10
11
12
13
14
15
16
17
18
19
20
21
22
23
24
25
26
27
28
29
30
31
32
33
34
35
36
37
38
39
40
41
42
43
44
45
46
47
48
49
50
51
52
53
54
55

static int __init my_init(void) { // 模块入口函数
int ret;
struct device *dev;
printk("========== [+] Init module. ==========\n");
ret = kfifo_alloc(&key_buf, 32, GFP_ATOMIC); // 申请kfifo队列
if (ret) {
printk("[!] Allocate memory failed.\n");
return ret;
}
printk("[+] Allocate kfifo successfully.\n");
// Trigger interrupt
ret = request_irq(1, (irq_handler_t)key_int_handler, IRQF_SHARED, "Key Hook", (void *)key_int_handler); // 申请IRQ
if (ret) {
printk("[!] Request irq failed.\n");
return ret;
}
printk("[+] Request irq successfully.\n");
// Register devices
printk("[*] Invoke alloc_chrdev_region.\n");
ret = alloc_chrdev_region(&dev_id, 0, 1, "mychar"); // 动态分配设备编号
if (ret >= 0) {
printk("[*] Invoke cdev_init.\n");
cdev_init(&key_dev, &key_fops); // 初始化字符设备
key_dev.owner = THIS_MODULE; // 设置实现驱动的模块为当前模块
printk("[*] Invoke cdev_add.\n");
ret = cdev_add(&key_dev, dev_id, 1); // 添加字符设备到系统中
if (ret >= 0) {
printk("[*] Invoke class_create.\n");
key_class = class_create(THIS_MODULE, "mychar"); // 创建一个类并注册到内核中
if (key_class) {
printk("[*] Invoke device_create.\n");
dev = device_create(key_class, NULL, dev_id, NULL, "mychar"); // 创建一个设备并注册到sysfs中
if (dev) {
goto success;
}else
{
printk("[!] device_create failed.\n");
}

} else {
class_destroy(key_class); // 删除类
printk("[!] Invoke class_create failed.\n");
}
cdev_del(&key_dev); // 删除字符设备
} else {
printk("[!] Invoke cdev_add failed.\n");
}
unregister_chrdev_region(dev_id, 1); // 释放设备编号
return ret;
}
success:
printk("[+] Create charactor device successfully.\n");
return 0;
}

3.中断处理函数

上面在注册中断的时候,加入了一个回调函数key_int_handler,但中断发生的时候,就会执行该函数,该函数由我们来编写。使用中断下半部的工作队列机制将处理推迟,或者进行调度。
首先使用DECLARE_WORK声明一个工作队列,被推迟的任务都叫做工作,放到该工作队列中。
描述工作的数据结构是work_struct。

内核里一直运行类似worker thread,它会对工作队列中的work进行处理,大致的工作流程原理可以参考下图所示:

在这里插入图片描述

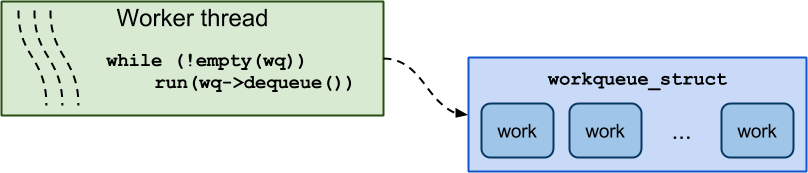
这里的work则是work_struct变量,并且绑定一个执行函数——typedef void (*work_func_t)(struct work_struct *work);。在worker thread中会对非空的工作队列进行工作队列的出队操作,并运行work绑定的函数。

1
2
3
4
5
6
7
8
9

struct work_struct {
atomic_long_t data;
struct list_head entry;//工作的链表
work_func_t func;//要执行的函数
#ifdef CONFIG_LOCKDEP
struct lockdep_map lockdep_map;
#endif
};
1
2
3
4
5
6
7
8
9
10
11
12
13
// 创建需要推后完成到工作,名为key_work,待执行函数为key_work_func
DECLARE_WORK(key_work, key_work_func); // 声明工作队列
irq_handler_t key_int_handler(int irq, void *dev) {
spin_lock(&key_lock);
scancode = inb(0x60); // 获取扫描码
spin_unlock(&key_lock);
spin_lock(&key_lock);
status = inb(0x64); // 获取按键状态
spin_unlock(&key_lock);
// printk("Key interrupt: scancode = 0x%x, status = 0x%x\n", scancode, status);
schedule_work(&key_work); // 调度工作队列
return (irq_handler_t)IRQ_HANDLED;
}

工作创建好以后,我们可以调度它,使用schedule_work提交给工作线程。其中inb(0x60),用于从0x60 IO端口读取扫描码。

下面看工作队列调度处理函数,主要完成的工作就是将前面获取到的扫描码,存入到fifo队列,同时唤醒等待读取的字符驱动数据的进程。

1
2
3
4
5
6
7
8
9
10
11
12
13
14
15
16
17
18
19
20

void key_work_func(struct work_struct *q) { // 工作队列调度函数
unsigned char code;
spin_lock(&key_lock); // 加上自旋锁
code = scancode; // 获取当前扫描码
spin_unlock(&key_lock);
if (code == 0xe0) { // 某些按键的特征符号
;
} else if (code & 0x80) { // 释放按键
// printk("In work: released \"%s\"\n", mappings[code - 0x80]);
} else { // 按下按键
// printk("In work: pressed \"%s\"\n", mappings[code]);
mutex_lock(&buf_lock);
kfifo_in(&key_buf, (void *)&code, sizeof(unsigned char)); // 将扫描码入队列
key_count++;
printk("[DEBUG] code = 0x%x, key_count = %d.\n", code, key_count);
wake_up_interruptible(&waitq); // 唤醒睡眠进程
mutex_unlock(&buf_lock);
}
}

4. 字符处理函数

实现字符驱动程序的读函数,读取fifo队列中的键盘扫描符,拷贝到用户空间。

1
2
3
4
5
6
7
8
9
10
11
12
13
14
15
16
17
18
19
20
static ssize_t myread(struct file *filp, char __user *buf, size_t count, loff_t *pos) { // 读设备函数
unsigned char *c;
int ret;
if (count == 0) { // 传入的count值不能为0
printk("[!] Count can not be 0.\n");
return -1;
}
printk("[DEBUG] kfifo_len = %d.\n", kfifo_len(&key_buf));
if (wait_event_interruptible(waitq, (kfifo_len(&key_buf) >= count))) // 睡眠并等待唤醒
return -ERESTARTSYS;
c = (unsigned char *)kmalloc(count, GFP_KERNEL); // 申请一块内存
mutex_lock(&buf_lock);
kfifo_out(&key_buf, c, count); // 将指定长度扫描码数据出队列
mutex_unlock(&buf_lock);
printk("[+] Copy buffer to user: %s.\n", c);
ret = copy_to_user(buf, c, count); // 将出队列的扫描码传给用户空间
kfree(c); // 释放申请的内存空间
c = 0; // 防止UAF
return count;
}

用户空间函数如下:

1
2
3
4
5
6
7
8
9
10
11
12
13
14
15
16
17
18
19
20
21
22
23
24
#include <stdio.h>
#include <unistd.h>
#include <fcntl.h>
#include <string.h>
#define BUF_SIZE 32 // 设置缓冲区
int main() {
int fd, c, i=0;
unsigned char buf[BUF_SIZE]; // 初始化缓冲区
// sudo mknod /dev/ex4 c 444 0
fd = open("/dev/mychar", O_RDONLY); // 打开字符设备
if (fd < 0) {
printf("[!] File open error.\n");
return -1;
}
char chr=-2;
while (1) {
c = read(fd, buf, BUF_SIZE); // 读取字符设备中的扫描码

printf("[+] Read scancode: %s (%d).\n", buf, c); // 把扫描码以字符串的形式输出
memset(buf,'\0',sizeof(buf));
}
close(fd); // 关闭字符设备
return 0;
}

5. 程序运行

Makefile 文件如下:

1
2
3
4
5
6
7
8
9
10
11
12
13
#Makefile文件注意:假如前面的.c文件起名为first.c,那么这里的Makefile文件中的.o文件就要起名为first.o    只有root用户才能加载和卸载模块
obj-m:=upper.o #产生interrupt模块的目标文件
#目标文件 文件 要与模块名字相同
CURRENT_PATH:=$(shell pwd) #模块所在的当前路径
LINUX_KERNEL:=$(shell uname -r) #linux内核代码的当前版本
LINUX_KERNEL_PATH:=/usr/src/linux-headers-$(LINUX_KERNEL)

all:
make -C $(LINUX_KERNEL_PATH) M=$(CURRENT_PATH) modules #编译模块
#[Tab] 内核的路径 当前目录编译完放哪 表明编译的是内核模块

clean:
make -C $(LINUX_KERNEL_PATH) M=$(CURRENT_PATH) clean #清理模块

在这里插入图片描述

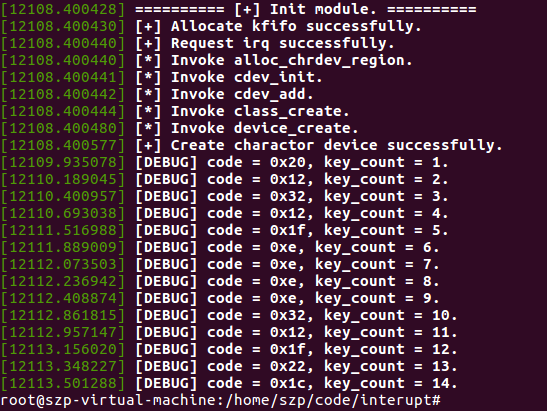
可以看到注册成功并输出了键盘的扫描符与统计的次数。

在这里插入图片描述

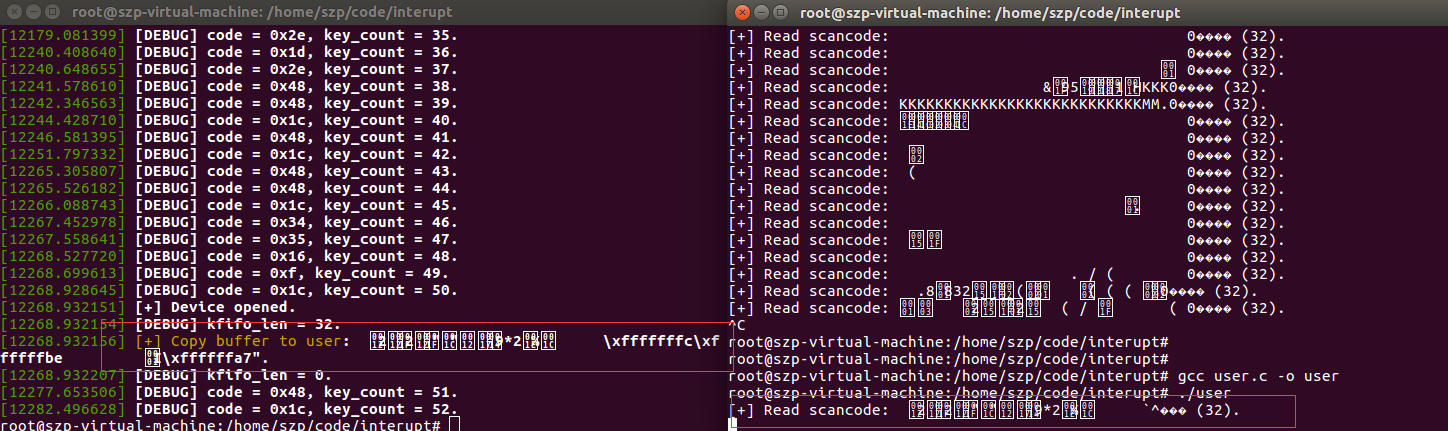
用户态程序,按照字符串格式输出了键盘的扫描符。

完整程序如下:

1
2
3
4
5
6
7
8
9
10
11
12
13
14
15
16
17
18
19
20
21
22
23
24
25
26
27
28
29
30
31
32
33
34
35
36
37
38
39
40
41
42
43
44
45
46
47
48
49
50
51
52
53
54
55
56
57
58
59
60
61
62
63
64
65
66
67
68
69
70
71
72
73
74
75
76
77
78
79
80
81
82
83
84
85
86
87
88
89
90
91
92
93
94
95
96
97
98
99
100
101
102
103
104
105
106
107
108
109
110
111
112
113
114
115
116
117
118
119
120
121
122
123
124
125
126
127
128
129
130
131
132
133
134
135
136
137
138
139
140
141
142
143
144
145
146
147
148
149
150
151
152
153
154
155
156
157
158
159
160
161
162
163
164
165
166
upper.c
#include <linux/module.h>
#include <linux/init.h>
#include <linux/kernel.h>
#include <linux/kfifo.h>
#include <linux/workqueue.h>
#include <linux/interrupt.h>
#include <linux/slab.h>
#include <linux/uaccess.h>
#include <linux/cdev.h>
MODULE_LICENSE("GPL");
MODULE_AUTHOR("linux");


// Variables for device creation
dev_t dev_id; // 设备号
struct cdev key_dev; // 字符设备结构体
struct class *key_class; // 字符设备对应的类
// Variables for keyboard interrupt
static unsigned char scancode, status; // 键盘扫描码、状态
static int key_count = 0; // 按键次数记录
static struct kfifo key_buf; // 内核队列
DEFINE_MUTEX(buf_lock); // 互斥锁
DEFINE_SPINLOCK(key_lock); // 自旋锁
static DECLARE_WAIT_QUEUE_HEAD(waitq); // 等待


void key_work_func(struct work_struct *q) { // 工作队列调度函数
unsigned char code;
spin_lock(&key_lock); // 加上自旋锁
code = scancode; // 获取当前扫描码
spin_unlock(&key_lock);
if (code == 0xe0) { // 某些按键的特征符号
;
} else if (code & 0x80) { // 释放按键
// printk("In work: released \"%s\"\n", mappings[code - 0x80]);
} else { // 按下按键
// printk("In work: pressed \"%s\"\n", mappings[code]);
mutex_lock(&buf_lock);
kfifo_in(&key_buf, (void *)&code, sizeof(unsigned char)); // 将扫描码入队列
key_count++;
printk("[DEBUG] code = 0x%x, key_count = %d.\n", code, key_count);
wake_up_interruptible(&waitq); // 唤醒睡眠进程
mutex_unlock(&buf_lock);
}
}
// 创建需要推后完成到工作,名为key_work,待执行函数为key_work_func
DECLARE_WORK(key_work, key_work_func); // 声明工作队列


irq_handler_t key_int_handler(int irq, void *dev) {
spin_lock(&key_lock);
scancode = inb(0x60); // 获取扫描码
spin_unlock(&key_lock);
spin_lock(&key_lock);
status = inb(0x64); // 获取按键状态
spin_unlock(&key_lock);
// printk("Key interrupt: scancode = 0x%x, status = 0x%x\n", scancode, status);
schedule_work(&key_work); // 调度工作队列
return (irq_handler_t)IRQ_HANDLED;
}
static int myopen(struct inode *inode, struct file *filp) { // 打开设备函数
printk("[+] Device opened.\n");
return 0;
}
static ssize_t myread(struct file *filp, char __user *buf, size_t count, loff_t *pos) { // 读设备函数
unsigned char *c;
int ret;
if (count == 0) { // 传入的count值不能为0
printk("[!] Count can not be 0.\n");
return -1;
}
printk("[DEBUG] kfifo_len = %d.\n", kfifo_len(&key_buf));
if (wait_event_interruptible(waitq, (kfifo_len(&key_buf) >= count))) // 睡眠并等待唤醒
return -ERESTARTSYS;
c = (unsigned char *)kmalloc(count, GFP_KERNEL); // 申请一块内存
mutex_lock(&buf_lock);
kfifo_out(&key_buf, c, count); // 将指定长度扫描码数据出队列
mutex_unlock(&buf_lock);
printk("[+] Copy buffer to user: %s.\n", c);
ret = copy_to_user(buf, c, count); // 将出队列的扫描码传给用户空间
kfree(c); // 释放申请的内存空间
c = 0; // 防止UAF
return count;
}
static int myrelease(struct inode *inode, struct file *filp) { // 释放设备函数
printk("[+] Device released.\n");
return 0;
}
struct file_operations key_fops = { // 初始化文件访问操作函数
.open = myopen,
.read = myread,
.release = myrelease,
};

static int __init my_init(void) { // 模块入口函数
int ret;
struct device *dev;
printk("========== [+] Init module. ==========\n");
ret = kfifo_alloc(&key_buf, 32, GFP_ATOMIC); // 申请kfifo队列
if (ret) {
printk("[!] Allocate memory failed.\n");
return ret;
}
printk("[+] Allocate kfifo successfully.\n");
// Trigger interrupt
ret = request_irq(1, (irq_handler_t)key_int_handler, IRQF_SHARED, "Key Hook", (void *)key_int_handler); // 申请IRQ
if (ret) {
printk("[!] Request irq failed.\n");
return ret;
}
printk("[+] Request irq successfully.\n");
// Register devices
printk("[*] Invoke alloc_chrdev_region.\n");
ret = alloc_chrdev_region(&dev_id, 0, 1, "mychar"); // 动态分配设备编号
if (ret >= 0) {
printk("[*] Invoke cdev_init.\n");
cdev_init(&key_dev, &key_fops); // 初始化字符设备
key_dev.owner = THIS_MODULE; // 设置实现驱动的模块为当前模块
printk("[*] Invoke cdev_add.\n");
ret = cdev_add(&key_dev, dev_id, 1); // 添加字符设备到系统中
if (ret >= 0) {
printk("[*] Invoke class_create.\n");
key_class = class_create(THIS_MODULE, "mychar"); // 创建一个类并注册到内核中
if (key_class) {
printk("[*] Invoke device_create.\n");
dev = device_create(key_class, NULL, dev_id, NULL, "mychar"); // 创建一个设备并注册到sysfs中
if (dev) {
goto success;
}else
{
printk("[!] device_create failed.\n");
}

} else {
class_destroy(key_class); // 删除类
printk("[!] Invoke class_create failed.\n");
}
cdev_del(&key_dev); // 删除字符设备
} else {
printk("[!] Invoke cdev_add failed.\n");
}
unregister_chrdev_region(dev_id, 1); // 释放设备编号
return ret;
}
success:
printk("[+] Create charactor device successfully.\n");
return 0;
}
static void __exit my_exit(void) {
printk("========== [+] Remove module. ==========\n");
printk("[*] Free irq.\n");
free_irq(1, (void *)key_int_handler); // 释放IRQ
printk("[*] Free kfifo.\n");
kfifo_free(&key_buf); // 释放队列
printk("[*] Invoke device_destroy.\n");
device_destroy(key_class, dev_id); // 删除设备
printk("[*] Invoke class_destroy.\n");
class_destroy(key_class); // 删除类
printk("[*] Invoke cdev_del.\n");
cdev_del(&key_dev); // 删除字符设备
printk("[*] Invoke unregister_chrdev_region.\n");
unregister_chrdev_region(dev_id, 1); // 释放设备编号
}
module_init(my_init);
module_exit(my_exit);
1
2
3
4
5
6
7
8
9
10
11
12
13
14
15
16
17
18
19
20
21
22
23
24
25
26
user.c

#include <stdio.h>
#include <unistd.h>
#include <fcntl.h>
#include <string.h>
#define BUF_SIZE 32 // 设置缓冲区
int main() {
int fd, c, i=0;
unsigned char buf[BUF_SIZE]; // 初始化缓冲区
// sudo mknod /dev/ex4 c 444 0
fd = open("/dev/mychar", O_RDONLY); // 打开字符设备
if (fd < 0) {
printf("[!] File open error.\n");
return -1;
}
char chr=-2;
while (1) {
c = read(fd, buf, BUF_SIZE); // 读取字符设备中的扫描码

printf("[+] Read scancode: %s (%d).\n", buf, c); // 把扫描码以字符串的形式输出
memset(buf,'\0',sizeof(buf));
}
close(fd); // 关闭字符设备
return 0;
}

PS:前往公众号“Linux工坊”,可以查看最新内容!关注即可免费领取面试&Linux技术书籍!

------ 本文结束------
  • 文章标题: 简单字符驱动程序与中断
  • 本文作者: 你是我的阳光
  • 发布时间: 2020年12月05日 - 22:01:27
  • 最后更新: 2022年11月07日 - 16:45:00
  • 本文链接: https://szp2016.github.io/Linux/简单键盘驱动程序与中断/
  • 版权声明: 本博客所有文章除特别声明外,均采用 BY-NC-SA 许可协议。转载请注明出处!
0%